
Nexus OS Configuration
Configurations
The Configurations Dialog box lists the cloud-configurable parameters for a Device, provides a convenient interface for copying configurations from one device to another and change the device’s associated site and organization.
Click the
icon from the Operations column to open the Configurations pop-up box of the selected device.
-20250619-124120-20250703-111605.png?inst-v=1c30eba9-f826-422b-a004-8e5dadae9d70)
Topology
The Configurations pop-up box contains the following options in its left menu bar - Traffic Policy, Firewall, WAN Profile, Hub IP, Quota, System and Association. These options can be used to create, copy and modify various configurations for the selected device.
Traffic Policy
The Traffic Policy option is selected by default.
-20250812-091332.png?inst-v=1c30eba9-f826-422b-a004-8e5dadae9d70)
Traffic Policy
The name of the Source Device is shown in the first field.
In the Traffic Policy Name field, select the required Network or Device traffic policy from the dropdown menu. The dropdown menu lists all the traffic policies existing in the source device.
Select the Target Type from the dropdown menu. The user has three options to select the target type.
Site - The selected configuration from the source device will be applied to all the devices of the selected sites. The user must further select the required sites from the new Select Site field.
Device - The selected configuration from the source device will be applied to only the selected Target devices. The user must further select the required devices from the new Select Device.
Managed Group - The selected configuration from the source device will be applied to all the devices under the selected Groups. These groups can be created in the Group Actions tab of the Inventory screen in Nexus Cloud. The user must further select the required groups from the new Managed Group field.
Click Apply button to copy the configurations from the source device and apply it to the target device/devices.
Firewall
Select the Firewall option from the left menu bar.
-20250812-091529.png?inst-v=1c30eba9-f826-422b-a004-8e5dadae9d70)
Firewall
The name of the Source Device is shown in the first field.
Select the Target Type from the dropdown menu. The user has three options to select the target type.
Site - The selected configuration from the source device will be applied to all the devices of the selected sites. The user must further select the required sites from the new Select Site field.
Device - The selected configuration from the source device will be applied to only the selected Target devices. The user must further select the required devices from the new Select Device.
Managed Group - The selected configuration from the source device will be applied to all the devices under the selected Groups. These groups can be created in the Group Actions tab of the Inventory screen in Nexus Cloud. The user must further select the required groups from the new Managed Group field.
Click Apply button to copy the configurations from the source device and apply it to the target device/devices.
WAN Profile
Select the WAN Profile option from the left menu bar.
-20250812-091700.png?inst-v=1c30eba9-f826-422b-a004-8e5dadae9d70)
WAN Profile
The name of the Source Device is shown in the first field.
In the WAN Profile Name field, select the required WAN Profile from the dropdown menu. The dropdown menu lists all the WAN profiles existing in the source device.
Select the Target Type from the dropdown menu. The user has three options to select the target type.
Site - The selected configuration from the source device will be applied to all the devices of the selected sites. The user must further select the required sites from the new Select Site field.
Device - The selected configuration from the source device will be applied to only the selected Target devices. The user must further select the required devices from the new Select Device.
Managed Group - The selected configuration from the source device will be applied to all the devices under the selected Groups. These groups can be created in the Group Actions tab of the Inventory screen in Nexus Cloud. The user must further select the required groups from the new Managed Group field.
Click Apply button to copy the configurations from the source device and apply it to the target device/devices.
Hub IP
Quota
Select the Quota option from the left menu bar.
-20250812-091818.png?inst-v=1c30eba9-f826-422b-a004-8e5dadae9d70)
Quota
The name of the Source Device is shown in the first field.
Select the Target Type from the dropdown menu. The user has three options to select the target type.
Site - The selected configuration from the source device will be applied to all the devices of the selected sites. The user must further select the required sites from the new Select Site field.
Device - The selected configuration from the source device will be applied to only the selected Target devices. The user must further select the required devices from the new Select Device.
Managed Group - The selected configuration from the source device will be applied to all the devices under the selected Groups. These groups can be created in the Group Actions tab of the Inventory screen in Nexus Cloud. The user must further select the required groups from the new Managed Group field.
Click Apply button to copy the configurations from the source device and apply it to the target device/devices.
System
Select the System option from the left menu bar.
-20250812-091921.png?inst-v=1c30eba9-f826-422b-a004-8e5dadae9d70)
System
The name of the Device is shown in the first field.
The Current EOS Version of the device is shown in the second field.
The Latest EOS Version available for the device is shown in the third field. Click the Upgrade button to download the latest EOS version and apply it.
The Save Config field is used to save the current configuration of the source device as a backup configuration. Enter the name of the Backup configuration and click the Download button to save it.
The Select Configuration field is used to apply an backup configuration from the system to the source device.
Select the required from the dropdown menu in the Select Configuration field. All the available backup configurations suitable for the current device will be listed in the dropdown menu.
Select the Upload button to apply the selected configuration.
The Konnect Status field shows the status of the internet connectivity of the current device. Click the Reboot button to restart the device.
Association
Select the Association option from the side menu bar to open the Association tab. This tab shows the device’s current organizational association and licensing details. It also provides controls for moving the device between organizations or to warehouse or changing its license.

Current Device Association
Under the Current Device Association Section, the Device Hierarchical Path field shows the full organizational structure where the device is currently associated.
The format is Organization / Site / Device Name. This helps to identify the exact location of the device in large multi-site deployments.
Click the Move Device button to transfer the device to another organization or site within the management system. The Move Device dialog box opens.
Move Device Only
Select the Move Device Only (Keep Existing Site) radio button to move the device to another Organization or Site.
-20250812-074646.png?inst-v=1c30eba9-f826-422b-a004-8e5dadae9d70)
Move Device Only
Select the required organization from the dropdown menu in the Organization field.
Select the required site from the dropdown menu in the Site field.
The Device field shows the name of the selected device.
Select the Move Device button to move the device to the selected organization and site.
Move Site and All Devices
Select the Move Site and All Devices radio button to move an entire and all its devices to another organization.
-20250812-075518.png?inst-v=1c30eba9-f826-422b-a004-8e5dadae9d70)
Move Site and All Devices
Select the required organization from the dropdown menu in the Organization field.
The Site field shows the name of the selected site.
The Device field shows that all devices will be moved.
Select the Move Site button to move the site to the selected organization.
Move Device to Warehouse
Select the Move Device to Warehouse radio button to move the device back to the warehouse.
-20250812-081850.png?inst-v=1c30eba9-f826-422b-a004-8e5dadae9d70)
Move Device to Warehouse
The Organization field shows the name of the selected organization.
The Site field shows the name of the selected site.
The Device field shows the name of the selected Device.
Select the Move To Warehouse button to move the device to the warehouse.
License
The License field shows the type of license currently assigned to the device.
The Remaining License Term shows how much time is left before the license expires. The user can monitor this field to avoid service interruptions and plan renewals.
Click the Change License button to modify the license type or duration for the device. The Change License dialog box opens.
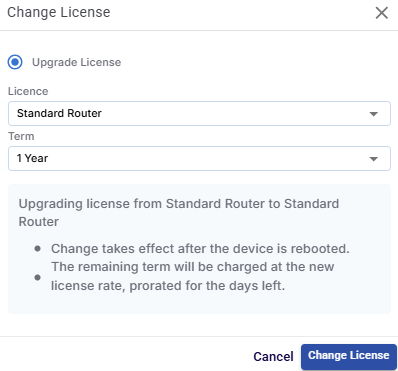
Change License
In the License field, select the required license type from the dropdown menu.
In the Term field, select the required license term from the dropdown menu.
Click the Change License button to update the license details and save the changes.