
Nexus 2- Hardware Description
Nexus 2
The Nexus 2 is a rugged and compact network appliance that is designed for use in industrial applications. It can be mounted horizontally or vertically (wall-mount) and the orientation will not affect its function. For best performance, the Nexus 2 should be mounted so that ambient or flowing air can pass across the heatsink fins. As there are no fans, the Nexus 2 does not have an active cooling system and convection cooling is the primary means of removing heat from the device.
The EF200is expandable in function through the use of USB dongles and adapters. Please consult the applicable Help Guides or contact Clarus Networks for expansion options.
Detailed Port Descriptions
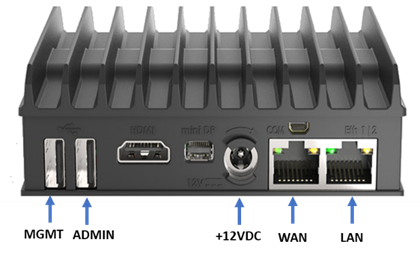
Nexus 2 Back Panel
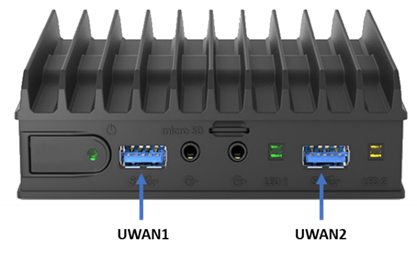
Nexus 2 Front Panel
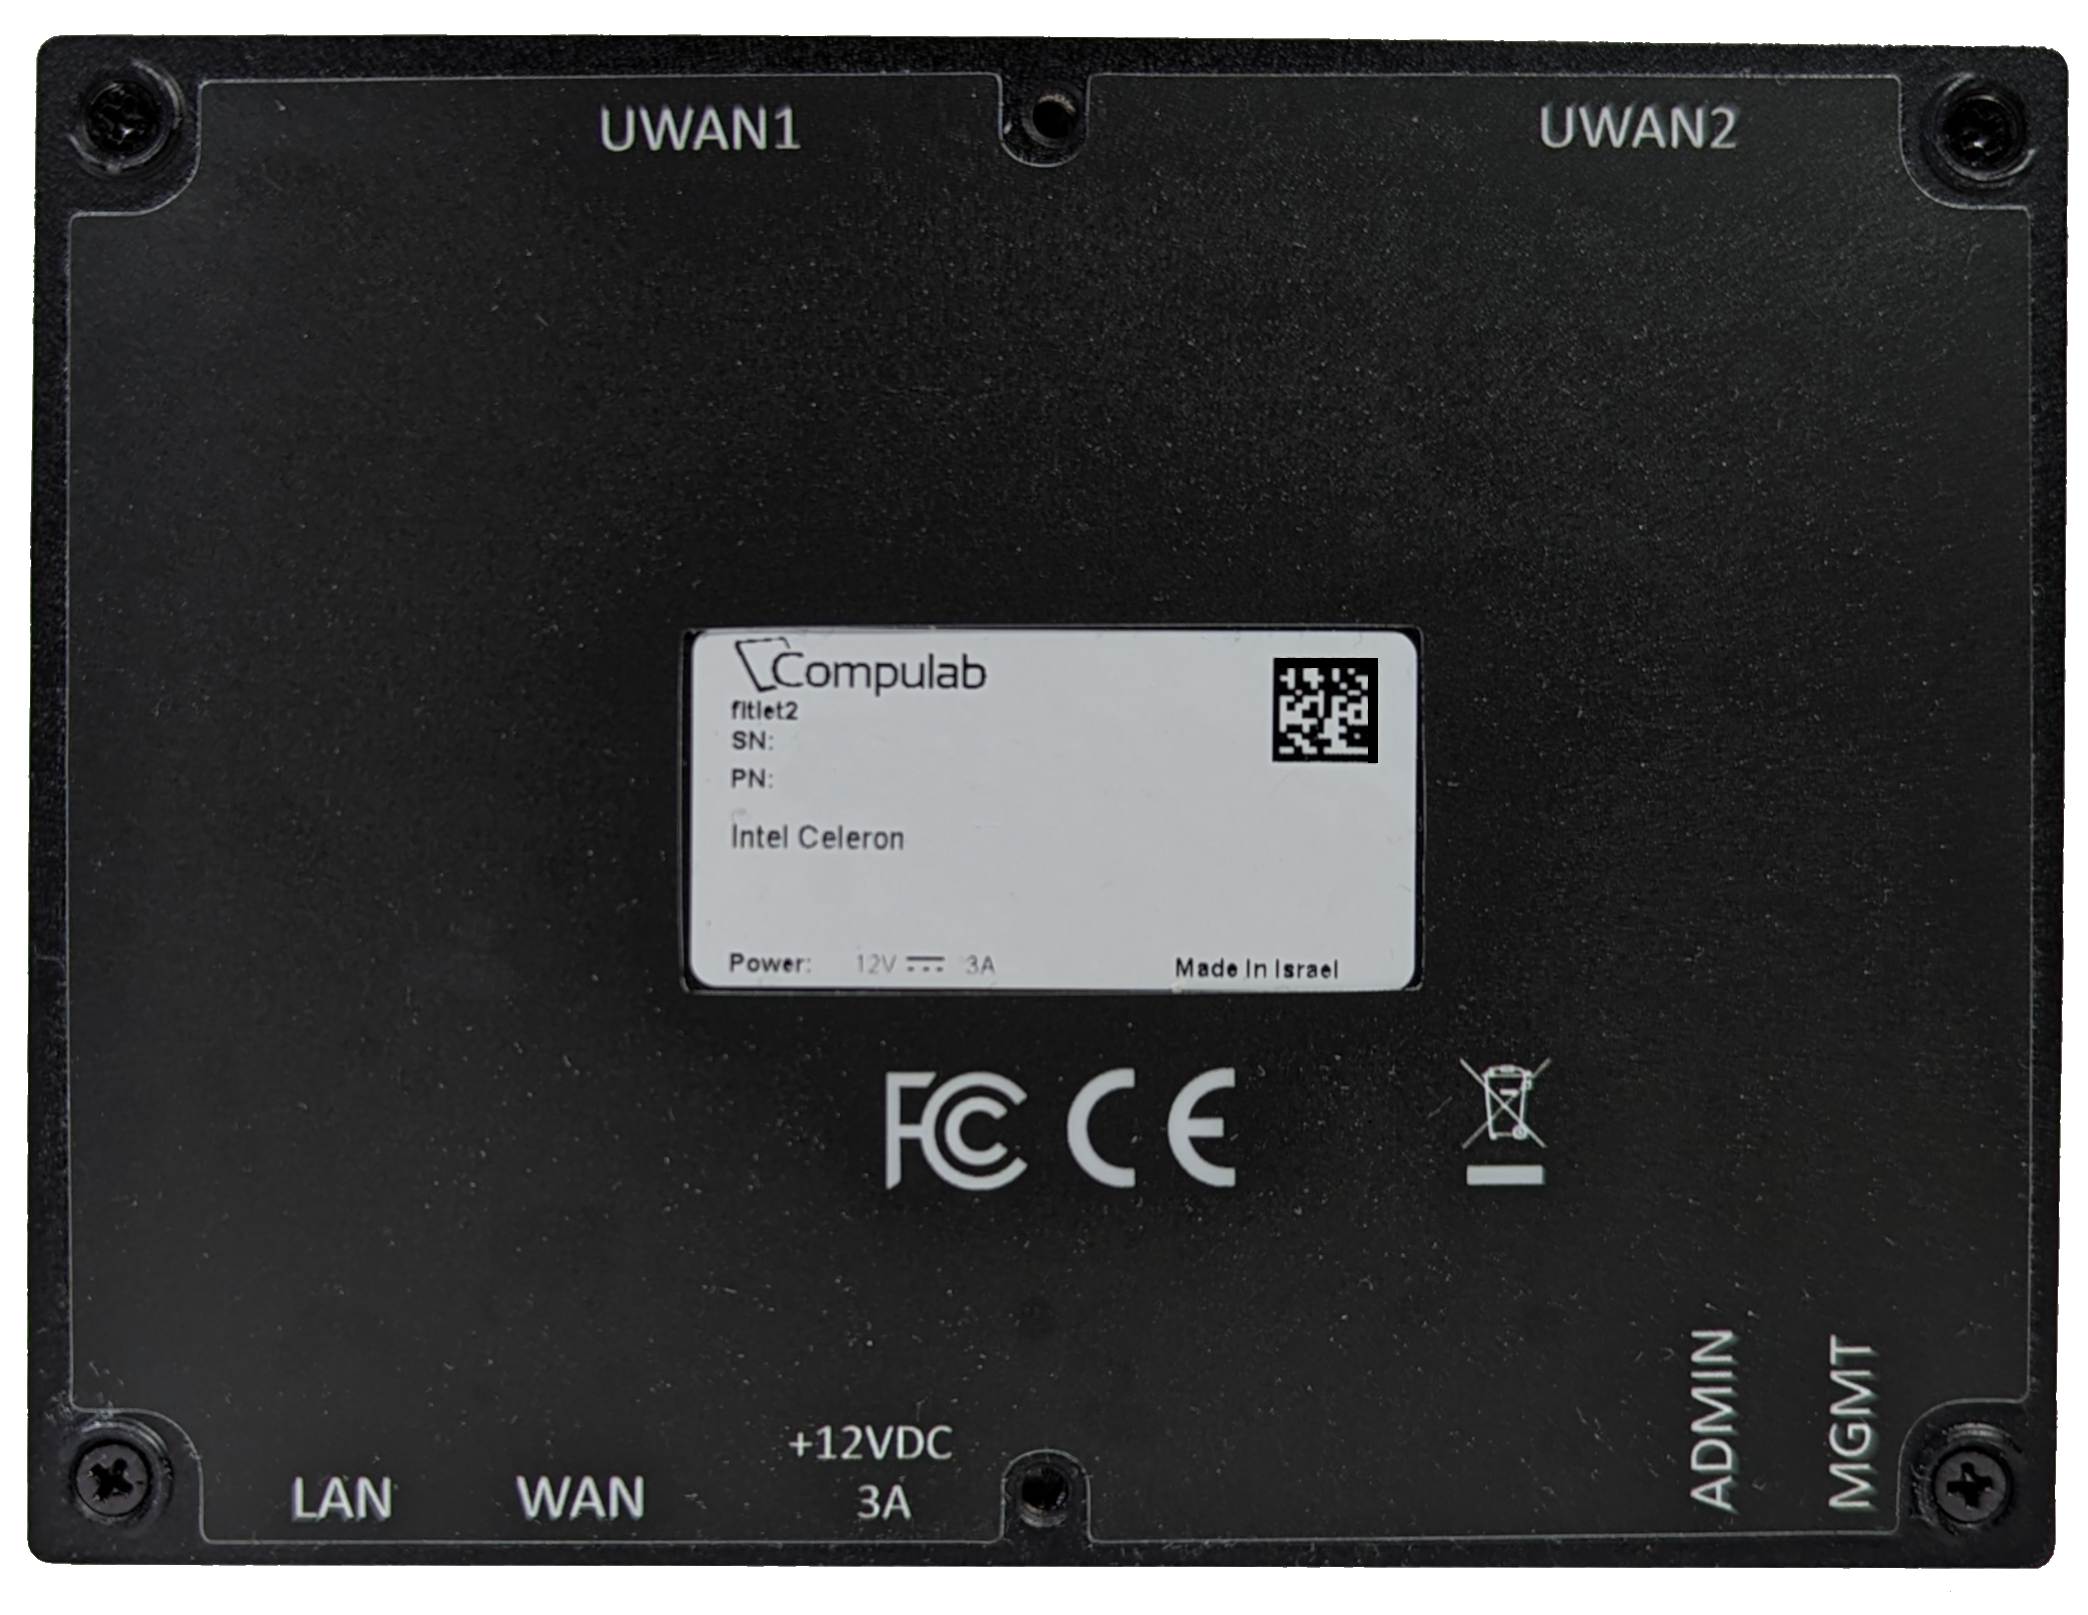
Nexus 2 Bottom Panel
Port Specification
Port Label | Specification | Function |
|---|---|---|
LAN | RJ45 : 1000/100/10 Mbps. | DHCP (default), LAN |
WAN | RJ45 : 1000/100/10 Mbps. | WAN input |
Power / +12VDC | 5.5 x 2.5mm : +7 to +20VDC | Power |
COM RS232 | mini Serial RS-232 | Not Used |
mini DP | mini DP 1.2 4K @ 60 Hz | Not Used |
HDMI | HDMI 1.4 4K @ 30 Hz | Terminal access / troubleshooting |
MGMT | USB Type A - USB 2.0 | User WAN port with USB to RJ45 ethernet adapter (limited to 480 Mbps) |
ADMIN | USB Type A : USB 2.0 | User WAN port with USB to RJ45 ethernet adapter (limited to 480 Mbps) |
UWAN1 | USB Type A : USB 3.0 | User WAN port using cellular modem or USB to RJ45 ethernet adapter |
UWAN2 | USB Type A : USB 3.0 | User WAN port using cellular modem or USB to RJ45 ethernet adapter |
microSD | Not Used | |
Line-Out | Not Used | |
Line-In | Not Used |
Power Specification
Power | +12VDC (15W Max); 100-240 VAC, 50-60 Hz (AC/DC Power Supply Included) |
Power Button and Power States
The Nexus 2 has 3 power states: On, Off and Sleep. The Sleep state is not widely used.
To turn the device On: Press the power button once.
To turn the device Off: Hold the power button for 5 seconds. Wait a minimum of 5 seconds before turning the device On again.
To Reboot the device: There is no physical reboot/reset button on Nexus 2. To reboot/restart the Nexus 2 from the On state, Press and hold the power button for 5 seconds, release the power button. wait 5 seconds, then press the power button once.
The following table details the procedure to switch between each of the three power states.
From | To Power State | ||
Power State | Off | Sleep | On |
Off | Press the power button once | ||
Sleep | Hold power button for 5 sec | Press the power button once | |
On | Hold power button for 5 sec | Press the power button once | |
LED Indicators
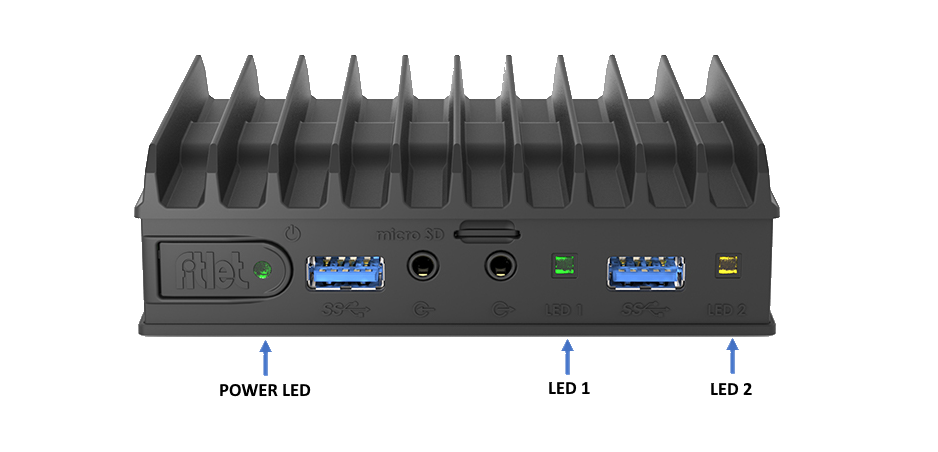
The Nexus 2 has 3 LEDs to indicate the power state and function of the device.
LED | State | Meaning |
Power LED | Green | Powered on |
Orange | Standby mode | |
Off | Powered off | |
LED 1 | Green | Operating normally |
Off | Powered off | |
LED 2 | Green | Operating normally |
Off | Powered off |
Power Protection Reset and Cycling Behavior
The Nexus 2 has an integrated Power Protection circuit that protects the device from intermittent and inconsistent power. This circuit requires removing power for a certain ‘lock-out’ period of time so that the Nexus 2 may reset and recognize that external power has been reapplied.
Clarus Networks recommends always using a dedicated Uninterruptable Power Supply (UPS) Battery Backup system for any Nexus 2 installation that may see sudden, momentary power resets.
Power Cycling Example Behavior Diagrams
Users may notice different behavior when cycling DC and AC power to the Nexus 2. The behavior can be explained in two ways:
The Nexus 2 has a few product variations with slightly different startup power behavior. These include differences in power management implementation based on manufacture date [which is not a parameter trackable by Device ID (DID)] and processor differences. Both variables change the power consumption and power lock-out time constant.
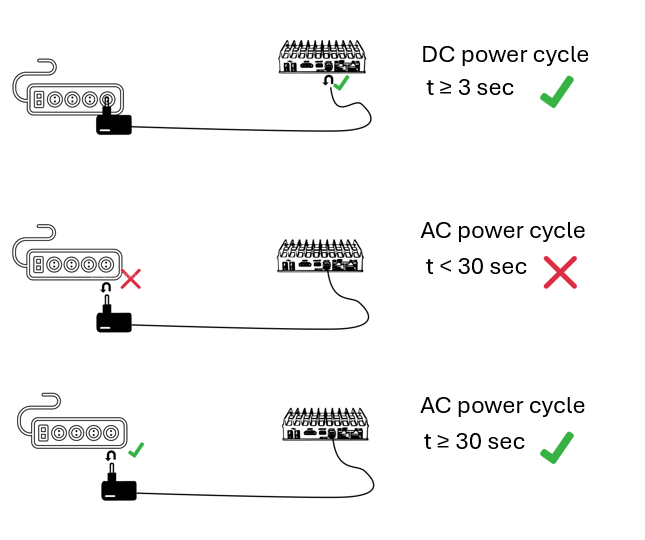
Different use cases have associated power hold-up and power lock-out times. The following diagrams show the power cycling behavior and timing in 2 different cases: cycling DC power and cycling AC power.
For all variants of the device, following these guidelines will have predictable behavior:
For consistent DC power restart behavior, DC power must be removed for 3 seconds before being reapplied.
For consistent AC power restart behavior, AC power must be removed for 30 seconds before being reapplied.

Timing Diagram for power cycling, DC or AC
Use Case Examples and timing requirements
Power Cycling Behavior Explained
Disconnecting DC power from Nexus 2
Cuts the DC voltage to Nexus 2
Nexus 2 runs from internal DC capacitance
Nexus 2 internal DC capacitance drains within 3 seconds
Disconnecting AC/DC adapter from AC Power Source (Mains)
AC/DC Adapter capacitance maintains +12VDC
Nexus 2 runs from internal DC capacitance and external AC/DC adapter capacitance
Nexus 2 drains internal and external capacitance within 30 seconds
Quickly reconnecting AC/DC adapter after disconnecting recharges the Nexus 2 and AC/DC adapter internal capacitance banks and extends the drain / power lock-out time up to 60 seconds.
Mechanical
Mounting Features
2x threading mounting holes: M3 x 0.5mm Depth: 4.5mm
Environmental
Operating temperature range
Up to -10°C to +50°C {Extended temperature range models available, when used with power supply}
Relative humidity
5% – 95% non-condensing
MIL STD 810G compliant
Vibration test:
IEC TR 60721-4-7:2001+A1:03, Class 7M1, test method IEC 60068-2-64 (up to 2 KHz , 3 axis)Shock test:
IEC TR 60721-4-7:2001+A1:03, Class 7M1, test method IEC 60068-2-27 (15g , 6 directions)
Device ID (DID) and Serial Number
Each device is assigned a unique Device ID (DID) and Serial Number. These identifiers are used for inventory management, registration, and customer support. The DID contains key hardware and manufacturing information, allowing customers and internal teams to identify the device model and configuration.
Device IDs are 17 characters long and follow the following format.
Example of an DID is - EF1G5AABCDEAABBCC
Description
Type Code
The first two characters of the DID represent the Type Code, which identifies the product model. Type Code of the Nexus 2 Model is EF.
Revision
Third character Revision is a single character that indicates the hardware revision of the device.
Manufacturer Code
Fourth character shows the Manufacturer Code. Refer the manufacturer codes below. In this example, G denotes the device was manufactured by GLiNet.
Manufacturer Code | Manufactured By |
K | K4 (Itasca) |
T | Tecnova |
A | Astronics |
G | GLiNet |
Date
The next two characters denote the date - years from 2020 + month.
For example:
Code | Year and Month Definition |
1A | 2021-10 |
1C | 2021-12 |
23 | 2022-03 |
2A | 2022-10 |
33 | 2023-03 |
Configuration
The next 5 characters denotes the configuration. These 5 characters are unique to each Model.
Serial Number
The last 6 characters are the serial number of the device.